Archive for March, 2012

March 30, 2012

Roasted Hot Peppers & Lemony Ricotta

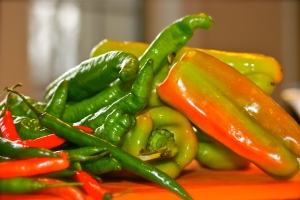
Assorted Italian Hot Peppers

On a recent work-related trip to Long Island, New York, I was fortunate enough to be taken to an Italian Market. With all the amazing foods around me, my first instinct was to grab a cart and do some serious food shopping, but I was 3 hours from home, and I only had a couple of minutes to look around. These beautiful peppers instantly caught my eye. I couldn’t leave without grabbing up an assortment to take home. I actually stated out loud that I couldn’t leave that day without these peppers! My insane food obsessions are with me at all times. I think I should start traveling with a cooler in the trunk, so I can randomly buy groceries wherever I go. You know, come to think of it, that’s not a bad idea.

I have a close friend whose Italian grandmother lived with her growing up. She was an adorable, non-English speaking, straight off-the-boat from Sicily, grandmother. A few years ago my friend shared her grandmother’s recipe for baked ricotta. Simple and so delicious. She served it with an olive, lemon zest, sun-dried tomato spread. I really do have a dear friend who lived with her little Italian grandmother and who shared a recipe for baked ricotta, but my romanticized memory of her Sicilian grandmother was all wrong, damn it! At this point I don’t think she’s even from Sicily! When I spoke with my friend to confirm the origins of the recipe for this post, she ruined it with the truth… the recipe was from her mother who found it in some magazine years ago. Oh well… regardless, I’m sticking with my memories of what I thought was her grandma’s recipe, and Anne Burrell’s baked ricotta from her book, Cook Like a Rockstar, as inspiration to make this cold ricotta spread to serve with the hot peppers. No baking required here. Lemony, creamy and soothing against the heat of the peppers – this ricotta partners perfectly with the roasted peppers and garlic.

Ready for the oven

INGREDIENTS

  • About 2-2 1/4lbs assorted hot peppers (long hots, small chilies, frying peppers – you choose, just make sure they’re spicy)
  • 2 big heads of garlic, separated into cloves and peeled
  • Kosher salt
  • Olive oil

Preheat the oven to 400 degrees.

To prepare the peppers: for cubanello/frying peppers, remove the core and cut in half or into thirds – like big rings. Cut long hots into 2 inch chunks or thirds, keeping seeds intact. Any small chilies can be left whole. Line a large baking dish with foil and add the peppers and whole peeled garlic cloves. Drizzle with enough olive oil to coat and give it a generous sprinkle of coarse salt. Using your hands, toss everything around ensuring it’s completely coated.

Place in the preheated oven at 400 degrees for 15 minutes, then reduce the heat to 350 degrees and continue roasting for another 35-40 minutes or until the peppers and garlic cloves are soft and slightly golden on the edges. You want the peppers to slump but still hold together. Remove from the oven and allow to cool a bit. Put in a serving dish and drizzle with additional olive oil before serving.

To store any remaining peppers, place in a bowl and add olive oil to just cover the top of the peppers. Put in the refrigerator, covered. These will still be delicious for a few days. Serve at room temperature.

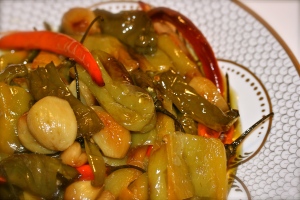
Roasted Italian Hot Peppers & Garlic

These peppers are really good with fresh mozzarella on ciabatta, or as I served them here with this lemony ricotta spread on crusty whole wheat baguette.

LEMONY RICOTTA SPREAD

There’s really no science to this combination, so my apologies for not having exact measurements.

  • 1-1 1/2 cups ricotta cheese
  • Zest of one lemon
  • Drizzle olive oil
  • Kosher Salt & Pepper

Put all the ingredients in a bowl and whip it up like you mean it! The olive oil will help the ricotta become a bit fluffy, so just add enough oil until you like the consistency. You should only need about 1 tbsp.

Spread this deliciousness on bread and top with roasted hot peppers and mushed roasted garlic cloves. YUM!

I’m serious…. YUM!
March 25, 2012

Spring Cleaning in the Pantry

Truth be told, I hate to clean. My father had a theory that if you didn’t move anything, you couldn’t see the dust. I don’t think that’s exactly true, unless you live in the dark, but it always gave us a good laugh. I’ll take 20 loads of dirty laundry over cleaning any day. But when spring rolls around, one thing I like to do is get a little more organized in the kitchen. You’ll find a plethora of tips all over the internet about reorganizing your life, most I think are common sense and the rest, unrealistic. Seriously, who has the time? Your kitchen is a fairly easy challenge.

My husband thinks my favorite thing to do is throw away food. This is far from the truth, but I do enjoy ransacking through the pantry, ridding it of all the expired crackers and ice cream sprinkles. There’s something so satisfying about getting a little fanatical about reorganizing your non-perishables. This year I focused on my spices, grains, rice and loose snacks. It did require a small investment at the housewares store for all these fabulous OXO air-tight storage containers, but it was well worth it.

A few months ago I discovered a small bulk food store, The Larderin Doylestown, PA. They carry everything from dried fruits and nuts, to rice, lentils and beans. They have an amazing selection of spices, which is what brought me to their door. I’ve been dabbling in a little Indian cooking, and the obscure spices required to make many of the recipes were nowhere to be found in my regular grocery store. The Larder’s pricing is fantastic! A visit to The Larder is what sparked my reorganizing. Here’s how it all turned out. I’ve included a few resources and tips to getting more organized – hopefully you will find this to be a helpful motivator for you to clean out your pantry, too.

AIRTIGHT CONTAINERS FOR PANTRY NON-PERISHABLES

  • These containers are perfect for rice, lentils, cookies, couscous, crackers, cookies, etc. They come in various sizes and their tops simply pop off with the press of the top button. When closed they are air-tight and really help to keep things fresh.
  • One of my favorite things to store is chocolate chips, which I buy from The Larder in bulk. I’m a traditionalist when it comes to chocolate chip cookies. I still make the recipe on the back of the Nestle Toll House bag. I cut the recipe off the back of the bag and keep it in the container. Brilliant!

  • If you want to get super cool and fancy, check out the kitchen containers at Alessi.com. They are beautiful, unique and expensive, but it’s still fun to look.

STORING SPICES

Get out your P-Touch! My anal retentiveness was in full swing with this one. I found these little air-tight spice jars which fit perfectly in my spice cabinet. I highly recommend scouting around where you live for a store like The Larder. If you like to cook, you can save a serious amount of money purchasing your spices in bulk.

  • These jars came in a set of 4 for $4.99 at Bed Bath & Beyond, they seem to only be available in stores. You can find spice jars in many shapes and sizes at your local housewares store or online. Just make sure they are air-tight, so your spices stay fresh. It’s always best to keep them in a dark place and out of direct sunlight.


Check out this article from Real Simple about purging your pantry. They provide some nice tips. I guess since I got all Martha last month, I might as well stay with that theme. Martha’s website has a great slide show of ideas for organizing everything in your kitchen (big surprise). My only question is, how many cats does she have? See the slide show. Once again Martha has made me feel inadequate. Her labels are so much fancier than mine. Will I ever meet up to her expectations? I just don’t think so.

Good luck with your kitchen organizing and happy spring!